Freezer Door [1]: Concept and first try
![Freezer Door [1]: Concept and first try](https://storage.ghost.io/c/fe/14/fe1439bb-44cb-4fc0-aa30-44bf49d2ab9f/content/images/size/w2000/2018/04/door-freezer-01_bb-1-.png)
My first project will be a simple one: a door (open / close) detector.
Although this project is very simple, I want to go the far as possible and not do only a dirty try.
I will use this project to know when my freezer door stays open to much, in order to have the possibility to close it because loosing all my home cooked food (and some pizzas too) :)
The first step consists to detect when the door open / close, and report this value to another system.
After that, I will try to improve the characteristics to create a battery power device.
Long-term goal
Here are the specs for my first object :
- Indoors sensor
- Wifi in reach
- Sensor: Magnetic Reed Switch
- Output:
- "Door status" signal
- If the door stays open/closed less than a minute, there is no need to send a "Door status" signal [1]
- "Low batteries" signal
- Input: No need to listen for orders
- Power: AA batteries, 1 year min
Platform choice
I want to build a simple object, as it is my first. Moreover, I don't have a gateway, and I don't want be take to much time building one.
So, I will use an ESP8266, and try NodeMCU firmware.
NodeMCU firmware V1.4.0
First try
It's my first attempt to make an object, and it's even more challenging with the use of LUA.
Don't hesitate to read the NodeMCU documentation.
I will use a NodeMCU Devkit on this first step and try :
- Not to hard code wifi login / password;
- Connect to an MQTT broker (see below);
- Send a value change to the MQTT broker.
MQTT
MQTT is a publish / subscribe messaging protocol. It is used in M2M exchanges.
NodeMCU has a library for connecting to a MQTT broker, to subscribe or publish to topics.
As such, we could build something like this:
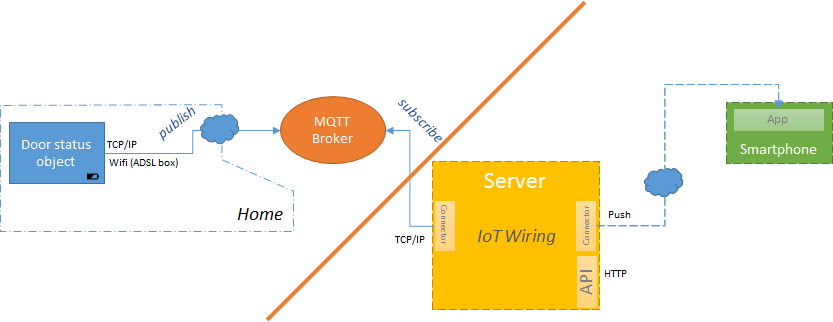
As a first try, we don't have any server or smartphone app. So everything at the right of the orange bar is not for today :)
The object will publish some events to the broker. Later, the server will subscribe to events on the broker, and will receive any new events.
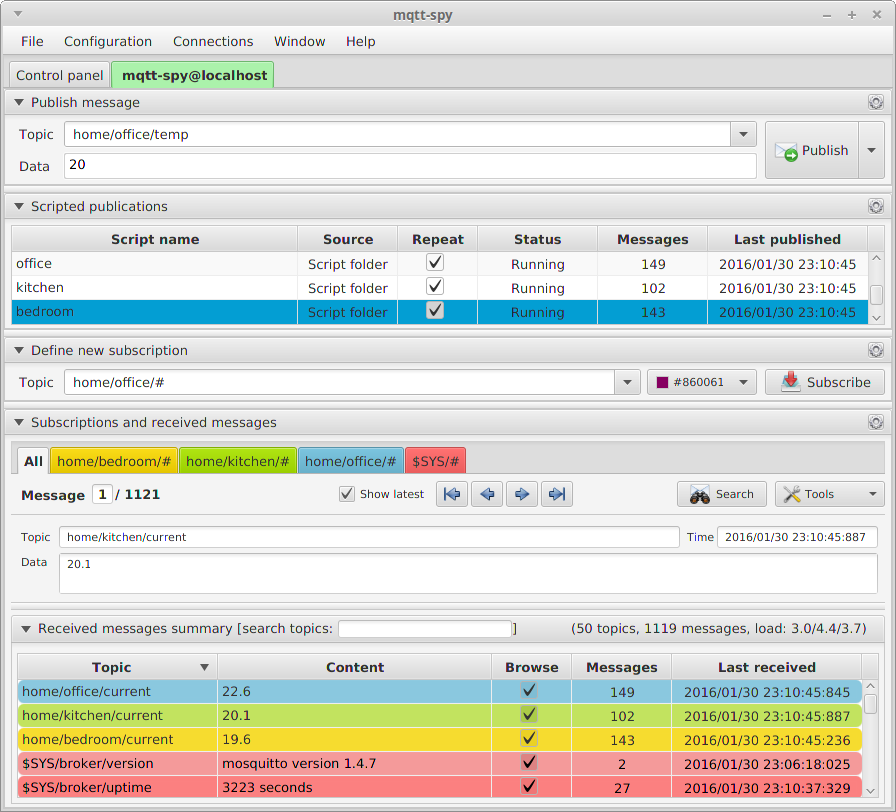
I will use MQTT-Spy to listen to my object. It's a simple MQTT client with a GUI (for Windows, Mac, Linux).
You can find some MQTT broker on the Internet. Here I will use Mosquitto, an open-source MQTT broker.
I don't even want to install an MQTT server right now ! So I will use Mosquitto test server.
Sensor
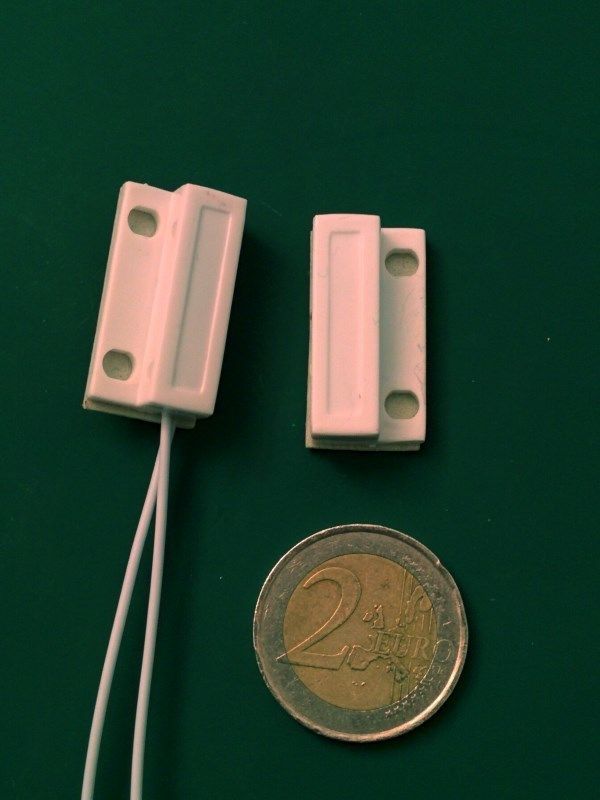
For this first project, I chose a simple sensor, a reed switch. I even find one already embedded into a plastic box, ready to be fixed on a door.
It's simple to use. When the two parts are close, the current can flow through the wire.
When the two parts are distant from few centimeters, the current is blocked.
I can connect it on a digital input, and read the level:
- LOW => Door open
- HIGH => Door close
Behavior
I discovered that NodeMCU is able to provide a enduser setup: a simple way of configuring ESP8266 chips without using a serial interface or pre-programming WiFi credentials onto the chip [2].
So, the behavior should be :
- If never configured, or cannot access configured wifi, start enduser setup mode
- If/when configured
- Connect to Wifi
- Connect to MQTT broker
- When the door state changes, a message is sent to the MQTT broker
In few iterations, it could be great to send the batteries level (in percent ?), and a keep-alive message at least once every 24h.
I will also add an RGB LED:
- Red flash when connecting to Wifi / MQTT Broker
- Blue flash when data has been sent
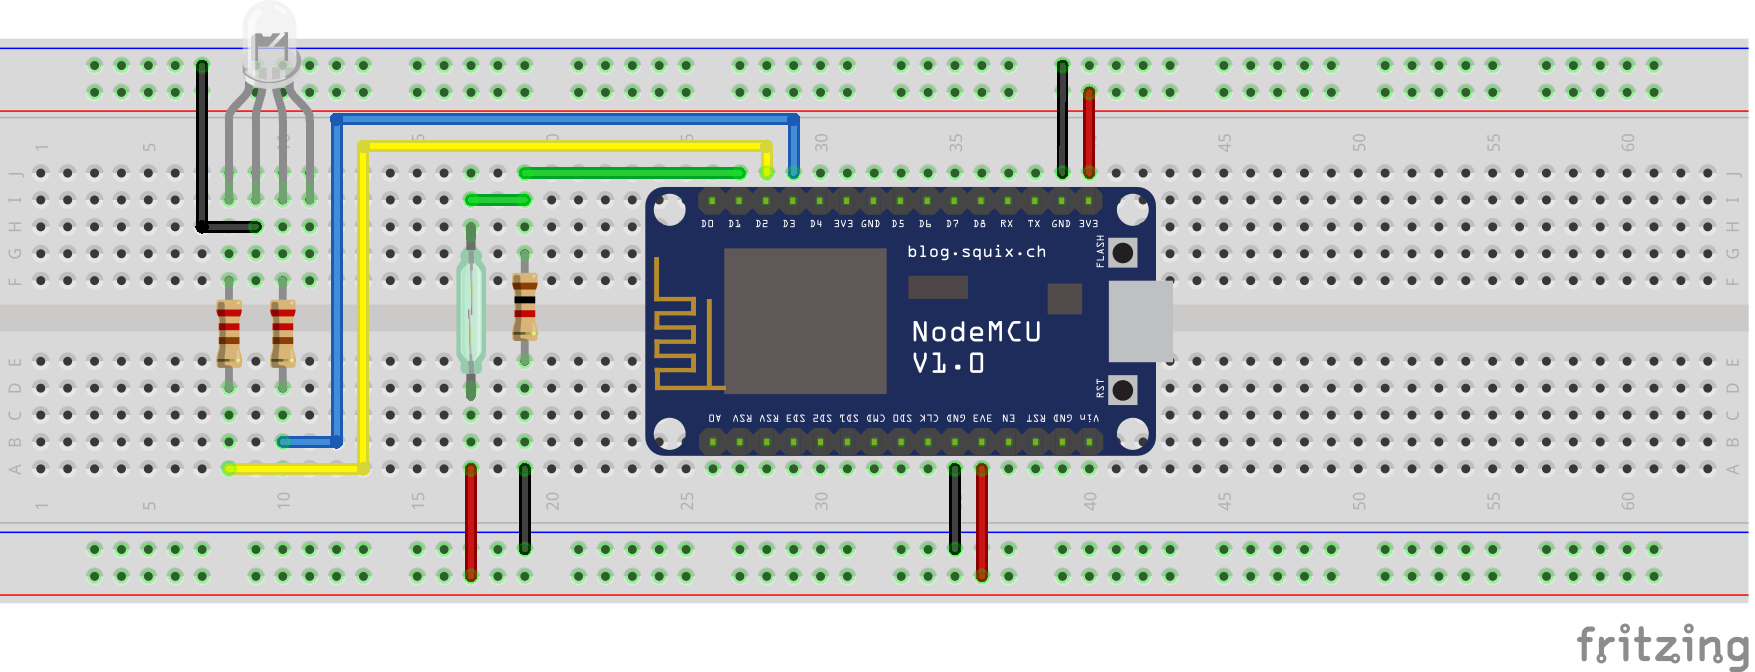
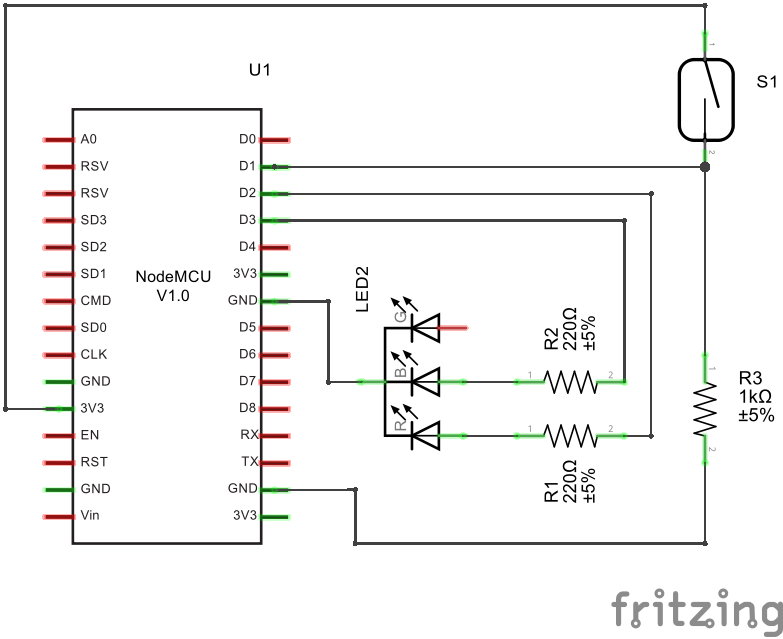
Breadboard circuit
I used :
- D1 for the reed switch
- D2 for the red LED
- D3 for the blue LED
I added a resistor to protect each LED, and a pull-down resistor on the reed switch.
Software
In order to upload / debug code on your ESP, I advise you to use ESPlorer (download - Source code).
I will write a post about this software soon (I hope !).
Code
This is my first code in LUA, I'm not sure that it's really efficient :P
Please note:
- I use an object to store config data
- I use a debounce function to avoid my switch status to bounce
- I configure the digital input of the reed switch to trigger a function when the input value change
- I don't encrypt the connexion to the MQTT broker. It's possible but not a priority right now
- I register some timers ("tmr" module) to being able to flash LEDs.
-- Config data
config = {}
config.PINS = {}
config.PINS.LED_ERROR = 2
config.PINS.LED_TX = 3
config.PINS.SWITCH_DOOR = 1
config.DEBOUNCE_MS = 50000
config.MQTT = {}
config.MQTT.CLIENT_NAME = "test-jde"
config.MQTT.HOST = "test.mosquitto.org"
config.MQTT.PORT = "1883"
config.MQTT.SECURE = false
config.MQTT.AUTORECONNECT = true

-- Constants
TIMER_ERROR = 1
TIMER_TX = 2

-- Utils
function registerTimerErrorLed()
    tmr.register(TIMER_ERROR, 500, tmr.ALARM_AUTO, function()
        local value = gpio.HIGH
        if gpio.read(config.PINS.LED_ERROR) == gpio.HIGH then
            value = gpio.LOW
        end
        gpio.write(config.PINS.LED_ERROR, value)
    end)
end

function registerTimerTxLed()
    tmr.register(TIMER_TX, 50, tmr.ALARM_AUTO, function()
        local value = gpio.HIGH
        if gpio.read(config.PINS.LED_TX) == gpio.HIGH then
            value = gpio.LOW
        end
        gpio.write(config.PINS.LED_TX, value)
    end)
end

function startError()
    tmr.start(TIMER_ERROR)
end

function stopError()
    tmr.stop(TIMER_ERROR)
    gpio.write(config.PINS.LED_ERROR, gpio.LOW)
end

function flashTxLedOnce()
    tmr.start(TIMER_TX)
    tmr.alarm(0, 300, tmr.ALARM_SINGLE, function()
        tmr.stop(TIMER_TX)
        gpio.write(config.PINS.LED_TX, gpio.LOW)
    end)
end


---------------------------------------------
-- Initialization
gpio.mode(config.PINS.LED_ERROR, gpio.OUTPUT)
gpio.write(config.PINS.LED_ERROR, gpio.LOW)
gpio.mode(config.PINS.LED_TX, gpio.OUTPUT)
gpio.write(config.PINS.LED_TX, gpio.LOW)
gpio.mode(config.PINS.SWITCH_DOOR, gpio.INT)
registerTimerErrorLed()
registerTimerTxLed()

-- Vars
mqttConnected = false
pulse1 = 0
du = 0

-- MQTT client
mqttClient = mqtt.Client(config.MQTT.CLIENT_NAME, 120, "", "", true)
mqttClient:on("offline", function(client)
    print ("MQTT offline")
    startError()
    mqttConnected = false
end)
mqttClient:on("connect", function(client)
    print ("MQTT connected")
    mqttConnected = true
    stopError()
    flashTxLedOnce()
end)

-- Trigger config
gpio.trig(config.PINS.SWITCH_DOOR, "both", function(level)
    du = tmr.now() - pulse1
    pulse1 = tmr.now()
    if du < config.DEBOUNCE_MS then return end

    if(mqttConnected == true) then
        local value
        if level == gpio.HIGH then value = "close" else value = "open" end
        mqttClient:publish("/door/" .. node.chipid(), value, 0, 0, function(client)
            print("Value sent: "..value)
            flashTxLedOnce()
        end)
    else
        print("Not connected to MQTT broker :(")
    end
end)

-- Auto-config
print("Started !")
startError()
enduser_setup.start(
  function()
    print("Connected to wifi as:" .. wifi.sta.getip())
    print("Connecting to MQTT broker: " .. config.MQTT.HOST)
    mqttClient:connect(config.MQTT.HOST, config.MQTT.PORT, config.MQTT.SECURE, config.MQTT.AUTORECONNECT)
  end,
  function(err, str)
    startError()
    print("enduser_setup: Err #" .. err .. ": " .. str)
  end
);
Program start
I saved and started the program with ESplorer.
- The red led flashes, slowly
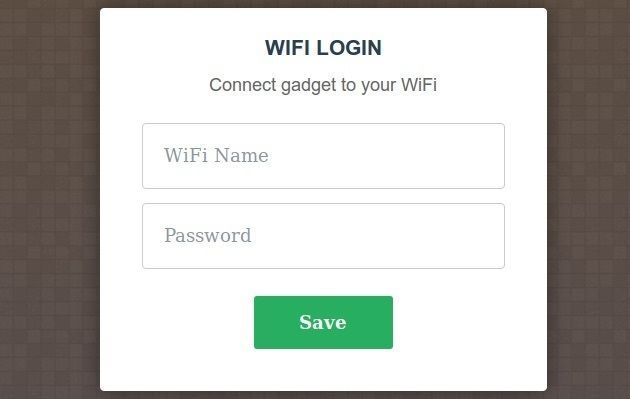
- With my computer, I joind an open Wifi network, named something like SetupGadget_XXXXX
- Once connected, I went to the URL http://192.168.4.1/ with Google Chrome
- An small form allowed me to specify on which the network the IoT device has to be connected
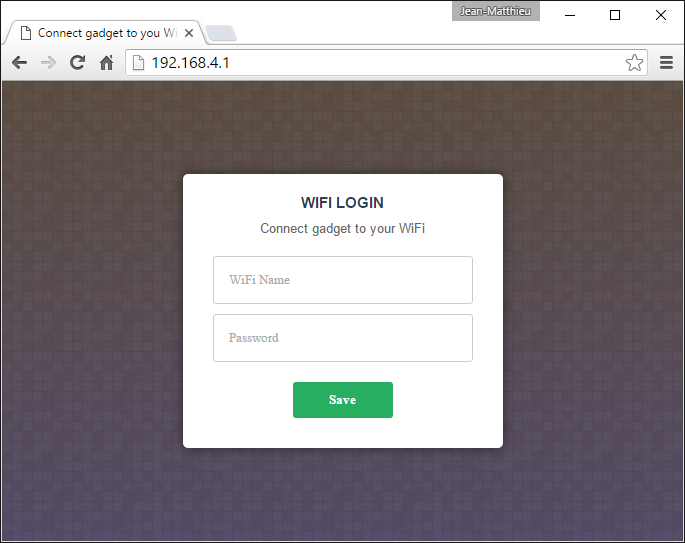
- Once the form filled and submitted, the wifi network disappeared
- Few seconds later, the red led flash stopped, to indicate that the network and the MQTT broker has been reached
- When I opened / closed the "door", and on each status change, the blue led flashed: a message has been sent !
I used MQTT Spy to spy the MQTT broker on the correct channel, and observed my messages !
Program output
> =dofile("init_test.lua")
Started !
> Connected to wifi as:192.168.0.42
Connecting to MQTT broker: 85.119.83.194
MQTT connected
Next steps
I used here a NodeMCU development kit board. It's easy to use but power hungry. The next big challenge is to run on a standalone ESP-01 or ESP-12 module.
Moreover, the card is always active. To save power, I have to put the module in deep sleep (wifi radio and PIC) and wake up / transmit only when necessary.
These will be the next steps for my freezer door sensor !
For these sensor, there is no need to know when the doors open or close, but only when the door stays open more than 1 minute. It is an important consideration for power saving. ↩︎
Sadly, the used NodeMCU version doesn't work very well with iOs devices (github commit). ↩︎